Docker Build
Once the Dockerfile is ready, the next step is to build the image using the docker build command from the command line. For example, let’s build the above Dockerfile using the build command from this repo root folder:
docker build . -f ./examples/ex-1/Dockerfile -t rkrispin/vscode-python:ex1 Here are the arguments we used with the build command:
- The
-ftag defines theDockerfilepath. This argument is optional and should be used if you are calling thebuildfunction from a different folder than one of theDockerfile - The
.symbol defines the context folder of the files system as the one of theDockerfile. Although we did not use the file system in this case, this enables us in other cases to call and copy files from our local folder to the image during the build time - The
-tis used to set the image’s name and tag (e.g., version). In this case, the image name isrkrispin/vscode-pythonand the tag isex1.
You should expect the following output:
[+] Building 94.2s (6/6) FINISHED
 => [internal] load build definition from Dockerfile                                                                                                                                                                          0.0s
 => => transferring dockerfile: 162B                                                                                                                                                                                          0.0s
 => [internal] load .dockerignore                                                                                                                                                                                             0.0s
 => => transferring context: 2B                                                                                                                                                                                               0.0s
 => [internal] load metadata for docker.io/library/python:3.10                                                                                                                                                                6.0s
 => [1/2] FROM docker.io/library/python:3.10@sha256:a8462db480ec3a74499a297b1f8e074944283407b7a417f22f20d8e2e1619782                                                                                                         82.1s
 => => resolve docker.io/library/python:3.10@sha256:a8462db480ec3a74499a297b1f8e074944283407b7a417f22f20d8e2e1619782                                                                                                          0.0s
 => => sha256:a8462db480ec3a74499a297b1f8e074944283407b7a417f22f20d8e2e1619782 1.65kB / 1.65kB                                                                                                                                0.0s
 => => sha256:4a1aacea636cab6af8f99f037d1e56a4de97de6025da8eff90b3315591ae3617 2.01kB / 2.01kB                                                                                                                                0.0s
 => => sha256:23e11cf6844c334b2970fd265fb09cfe88ec250e1e80db7db973d69d757bdac4 7.53kB / 7.53kB                                                                                                                                0.0s
 => => sha256:bba7bb10d5baebcaad1d68ab3cbfd37390c646b2a688529b1d118a47991116f4 49.55MB / 49.55MB                                                                                                                             26.1s
 => => sha256:ec2b820b8e87758dde67c29b25d4cbf88377601a4355cc5d556a9beebc80da00 24.03MB / 24.03MB                                                                                                                             11.0s
 => => sha256:284f2345db055020282f6e80a646f1111fb2d5dfc6f7ee871f89bc50919a51bf 64.11MB / 64.11MB                                                                                                                             26.4s
 => => sha256:fea23129f080a6e28ebff8124f9dc585b412b1a358bba566802e5441d2667639 211.00MB / 211.00MB                                                                                                                           74.5s
 => => sha256:7c62c924b8a6474ab5462996f6663e07a515fab7f3fcdd605cae690a64aa01c7 6.39MB / 6.39MB                                                                                                                               28.2s
 => => extracting sha256:bba7bb10d5baebcaad1d68ab3cbfd37390c646b2a688529b1d118a47991116f4                                                                                                                                     1.6s
 => => sha256:c48db0ed1df2d2df2dccd680323097bafb5decd0b8a08f02684b1a81b339f39b 17.15MB / 17.15MB                                                                                                                             31.9s
 => => extracting sha256:ec2b820b8e87758dde67c29b25d4cbf88377601a4355cc5d556a9beebc80da00                                                                                                                                     0.6s
 => => sha256:f614a567a40341ac461c855d309737ebccf10a342d9643e94a2cf0e5ff29b6cd 243B / 243B                                                                                                                                   28.4s
 => => sha256:00c5a00c6bc24a1c23f2127a05cfddd90865628124100404f9bf56d68caf17f4 3.08MB / 3.08MB                                                                                                                               29.4s
 => => extracting sha256:284f2345db055020282f6e80a646f1111fb2d5dfc6f7ee871f89bc50919a51bf                                                                                                                                     2.5s
 => => extracting sha256:fea23129f080a6e28ebff8124f9dc585b412b1a358bba566802e5441d2667639                                                                                                                                     6.2s
 => => extracting sha256:7c62c924b8a6474ab5462996f6663e07a515fab7f3fcdd605cae690a64aa01c7                                                                                                                                     0.3s
 => => extracting sha256:c48db0ed1df2d2df2dccd680323097bafb5decd0b8a08f02684b1a81b339f39b                                                                                                                                     0.5s
 => => extracting sha256:f614a567a40341ac461c855d309737ebccf10a342d9643e94a2cf0e5ff29b6cd                                                                                                                                     0.0s
 => => extracting sha256:00c5a00c6bc24a1c23f2127a05cfddd90865628124100404f9bf56d68caf17f4                                                                                                                                     0.2s
 => [2/2] RUN apt-get update && apt-get install -y --no-install-recommends curl                                                                                                                                               5.9s
 => exporting to image                                                                                                                                                                                                        0.1s
 => => exporting layers                                                                                                                                                                                                       0.1s
 => => writing image sha256:a8e4c6d06c97e9a331a10128d1ea1fa83f3a525e67c7040c2410940312e946f5                                                                                                                                  0.0s
 => => naming to docker.io/rkrispin/vscode-python:ex1
Note: The above output of the build describes the different layers of the image. Don’t worry if, at this point, it looks and sounds like gibberish. Reading this output type will be easier after reading the next section, which focuses on the image layers.
You can use the docker images command to validate that the image was created successfully:
>docker images
REPOSITORY                             TAG       IMAGE ID       CREATED        SIZE
rkrispin/vscode-python                 ex1       a8e4c6d06c97   43 hours ago   1.02GB
The next section will focus on the image layers and caching process.
The image layers
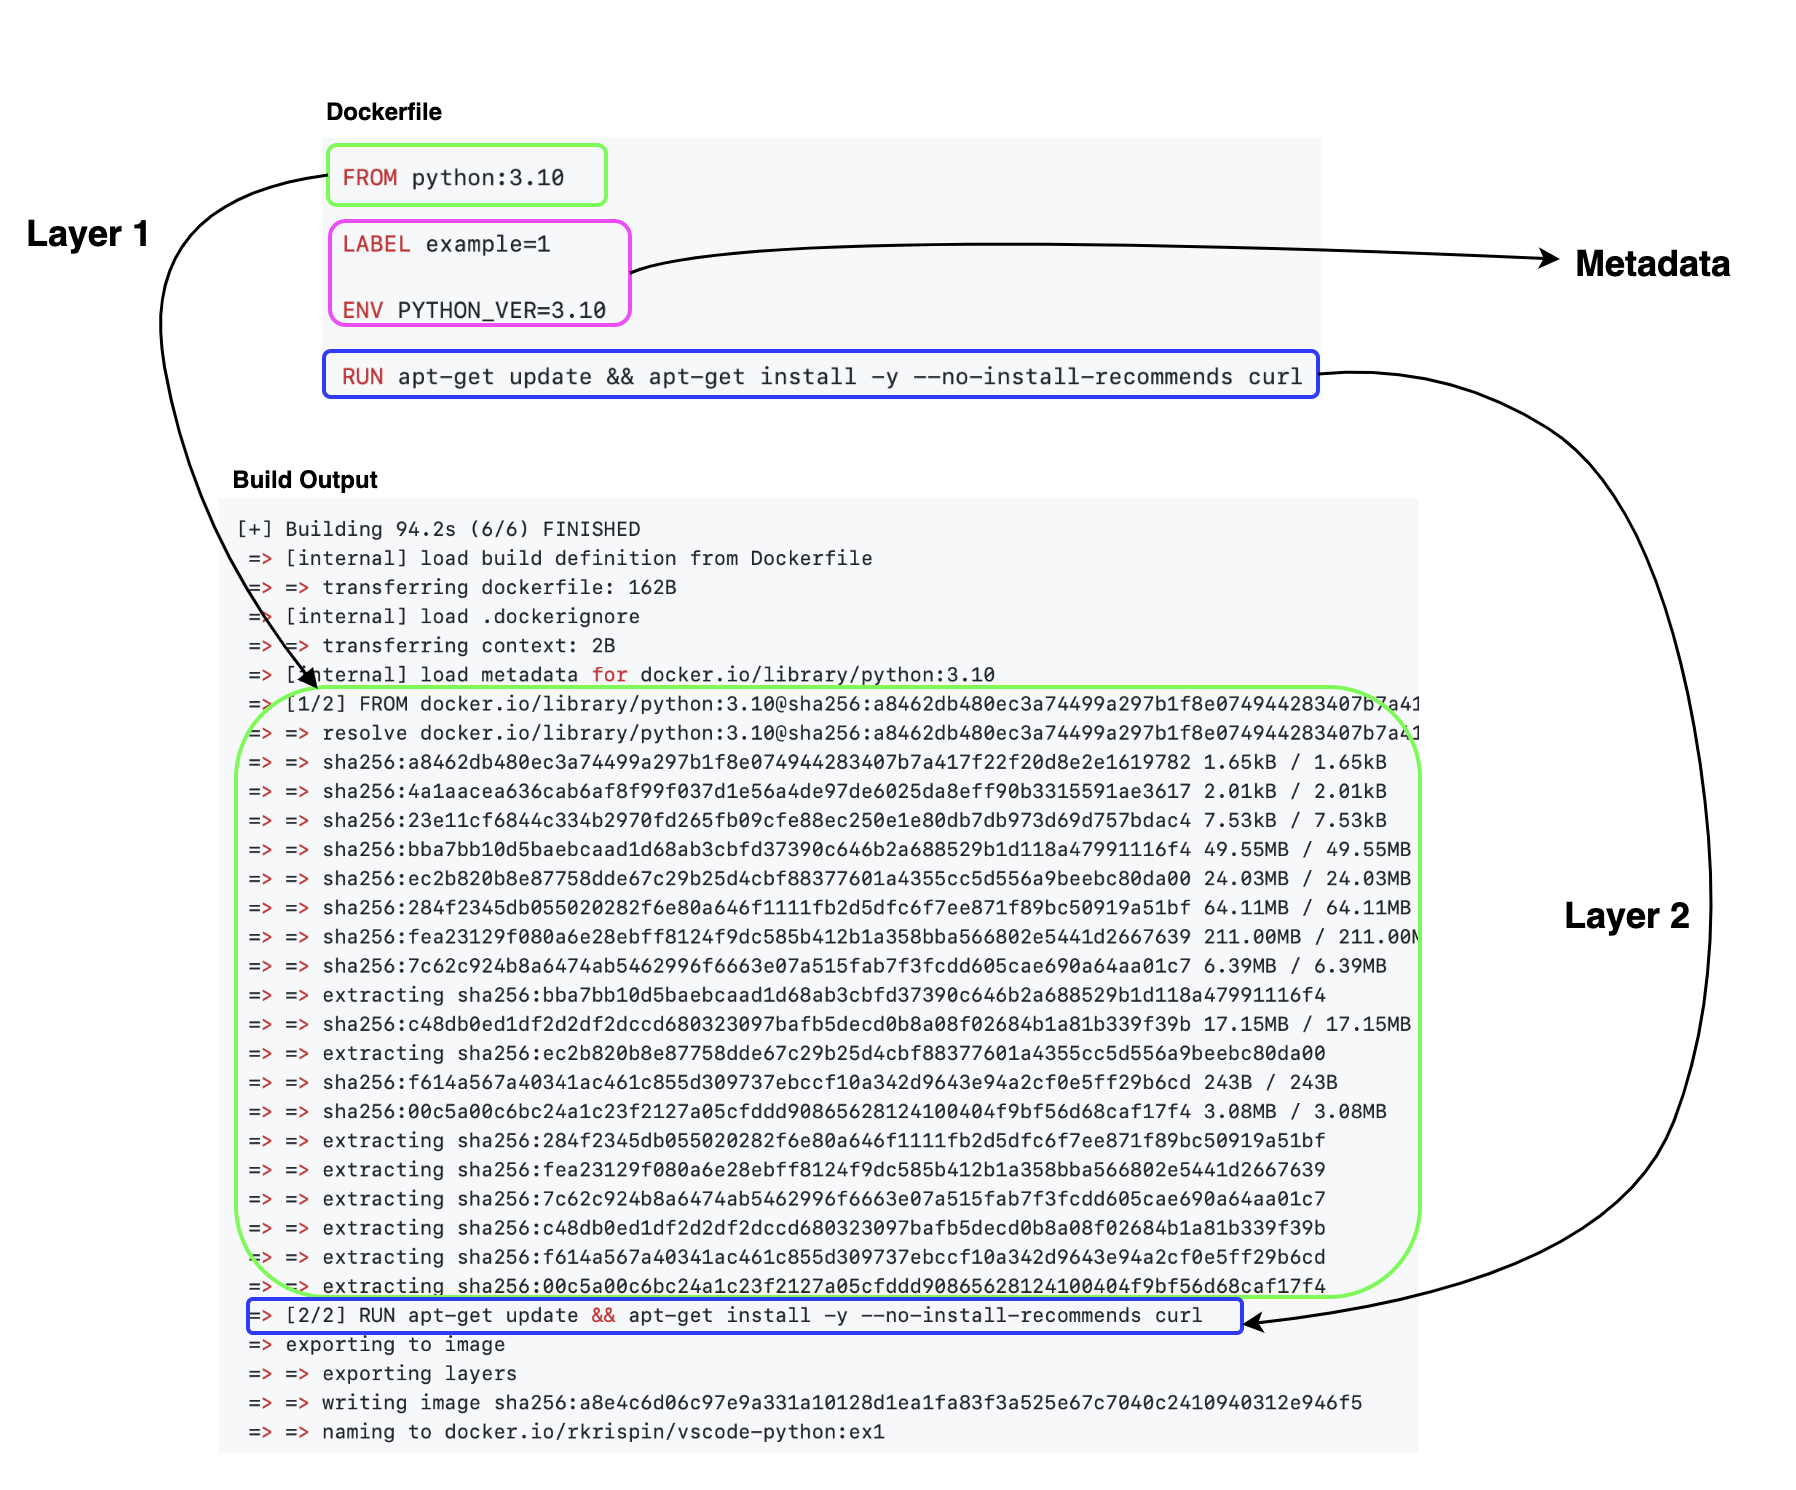
The build process of Docker’s images is based on layers. Depending on the context, the docker engine takes each one of the Dockerfile commands during the build time and translates it either into layer or metadata. Dockerfile commands, such as FROM and RUN are translated into a layer, and commands, such as LABEL, ARG, ENV, and CMD are translated into metadata. For example, we can observe in the output of the build of rkrispin/vscode-python image above that there are two layers:
- The first layer started with
[1/2] FROM..., corresponding to theFROM python:3.10line on theDockerfile, which import the Python 3.10 official image - The second layer started with
[2/2] RUN apt-get..., corresponding to theRUNcommand on theDockerfile

The docker inspect command returns the image metadata details in a JSON format. That includes the envrioment variables, labels, layers and general metadata. In the following example, we will us jq to extract the layers information from the metadata JSON file:
> docker inspect rkrispin/vscode-python:ex1 | jq '.[] | .RootFS'
{
  "Type": "layers",
  "Layers": [
    "sha256:332b199f36eb054386cd2931c0824c97c6603903ca252835cc296bacde2913e1",
    "sha256:2f98f42985b15cbe098d2979fa9273e562e79177b652f1208ae39f97ff0424d3",
    "sha256:964529c819bb33d3368962458c1603ca45b933487b03b4fb2754aa55cc467010",
    "sha256:e67fb4bad8f42cca08769ee21bbe15aca61ab97d4a46b181e05fefe3a03ee06d",
    "sha256:037f26f869124174b0d6b6d97b95a5f8bdff983131d5a1da6bc28ddbc73531a5",
    "sha256:737cec5220379f795b727e6c164e36e8e79a51ac66a85b3e91c3f25394d99224",
    "sha256:65f4e45c2715f03ed2547e1a5bdfac7baaa41883450d87d96f877fbe634f41a9",
    "sha256:baef981f26963b264913e79bd0a1472bae389441022d71f559e9d186600d2629",
    "sha256:88e1d36ff4812423afc93d5f6208f2783df314d5ecf6f961325c65e1dbf891da"
  ]
}
As you can see from the image’s layers output above, the rkrispin/vscode-python:ex1 image has nine layers. Each layer is represented by its hash key (e.g., sha256:...), and it is cached on the backend. While we saw on the build output that the docker engine triggered two processes from the FROM and RUN commands, we ended up with nine layers as opposed to two. The main reason for that is related to the fact that when importing the baseline image, we inherited the imported image characteristics, including the layers. In this case, we used the FROM to import the official Python image, which included eight layers, and then added the 9th layer by executing the RUN commands. You can test it by pulling the baseline image and using the inspect command to review its layers:
> docker pull python:3.10
3.10: Pulling from library/python
bba7bb10d5ba: Already exists
ec2b820b8e87: Already exists
284f2345db05: Already exists
fea23129f080: Already exists
7c62c924b8a6: Already exists
c48db0ed1df2: Already exists
f614a567a403: Already exists
00c5a00c6bc2: Already exists
Digest: sha256:a8462db480ec3a74499a297b1f8e074944283407b7a417f22f20d8e2e1619782
Status: Downloaded newer image for python:3.10
docker.io/library/python:3.10

> docker inspect python:3.10 | jq '.[] | .RootFS'
{
  "Type": "layers",
  "Layers": [
    "sha256:332b199f36eb054386cd2931c0824c97c6603903ca252835cc296bacde2913e1",
    "sha256:2f98f42985b15cbe098d2979fa9273e562e79177b652f1208ae39f97ff0424d3",
    "sha256:964529c819bb33d3368962458c1603ca45b933487b03b4fb2754aa55cc467010",
    "sha256:e67fb4bad8f42cca08769ee21bbe15aca61ab97d4a46b181e05fefe3a03ee06d",
    "sha256:037f26f869124174b0d6b6d97b95a5f8bdff983131d5a1da6bc28ddbc73531a5",
    "sha256:737cec5220379f795b727e6c164e36e8e79a51ac66a85b3e91c3f25394d99224",
    "sha256:65f4e45c2715f03ed2547e1a5bdfac7baaa41883450d87d96f877fbe634f41a9",
    "sha256:baef981f26963b264913e79bd0a1472bae389441022d71f559e9d186600d2629"
  ]
}
Layers caching
One of the cons of Docker is the image build time. As the level of complexity of the Dockerfile is higher (e.g., a large number of dependencies), the longer the build time. Sometimes, your build won’t execute as expected on the first try. Either some requirements are missing, or something breaks during the build time. This is where the use of caching helps in reducing the image rebuild time. Docker has smart mechanization that identifies if each layer should be built from scratch or can leverage a cached layer and save time. For example, let’s add to the previous example another command to install the vim editor. Generally, we can (and should) add it to the same apt-get we are using to install the curl package, but for the purpose of showing the layers caching functionality, we will run it separately:
./examples/ex-2/Dockerfile
FROM python:3.10

LABEL example=1

ENV PYTHON_VER=3.10

RUN apt-get update && apt-get install -y --no-install-recommends curl

RUN apt-get update && apt-get install -y --no-install-recommends vim
We will use the below command to build this image and tag it as rkrispin/vscode-python:ex2:
docker build . -f ./examples/ex-2/Dockerfile -t rkrispin/vscode-python:ex2 --progress=plainYou should expect the following output (if ran the previous build):
 => [internal] load build definition from Dockerfile                                                                                                                                     0.0s
 => => transferring dockerfile: 234B                                                                                                                                                     0.0s
 => [internal] load .dockerignore                                                                                                                                                        0.0s
 => => transferring context: 2B                                                                                                                                                          0.0s
 => [internal] load metadata for docker.io/library/python:3.10                                                                                                                           0.0s
 => [1/3] FROM docker.io/library/python:3.10                                                                                                                                             0.0s
 => CACHED [2/3] RUN apt-get update && apt-get install -y --no-install-recommends curl                                                                                                   0.0s
 => [3/3] RUN apt-get update && apt-get install -y --no-install-recommends vim                                                                                                          34.3s
 => exporting to image                                                                                                                                                                   0.4s
 => => exporting layers                                                                                                                                                                  0.4s
 => => writing image sha256:be39eb0eb986f083a02974c2315258377321a683d8472bac15e8d5694008df35                                                                                             0.0s
 => => naming to docker.io/rkrispin/vscode-python:ex2
As can be noticed from the above build output, the first and second layers already exist from the previous build. Therefore, the docker engine adds their cached layers to the image (as opposed to building them from scratch), and just builds the 3rd layer and installs the vim editor.
Note: By default, the build output is concise and short. You can get more detailed output during the build time by adding the progress argument and setting it to plain:
> docker build . -f ./examples/ex-2/Dockerfile -t rkrispin/vscode-python:ex2 --progress=plain
#1 [internal] load .dockerignore
#1 transferring context: 2B done
#1 DONE 0.0s

#2 [internal] load build definition from Dockerfile
#2 transferring dockerfile: 234B done
#2 DONE 0.0s

#3 [internal] load metadata for docker.io/library/python:3.10
#3 DONE 0.0s

#4 [1/3] FROM docker.io/library/python:3.10
#4 DONE 0.0s

#5 [2/3] RUN apt-get update && apt-get install -y --no-install-recommends curl
#5 CACHED

#6 [3/3] RUN apt-get update && apt-get install -y --no-install-recommends vim
#6 CACHED

#7 exporting to image
#7 exporting layers done
#7 writing image sha256:be39eb0eb986f083a02974c2315258377321a683d8472bac15e8d5694008df35 0.0s done
#7 naming to docker.io/rkrispin/vscode-python:ex2 done
#7 DONE 0.0s
Since we already cached the 3rd layer on the previous build, all the layers in the above output are cached, and the run time is less than 1 second.
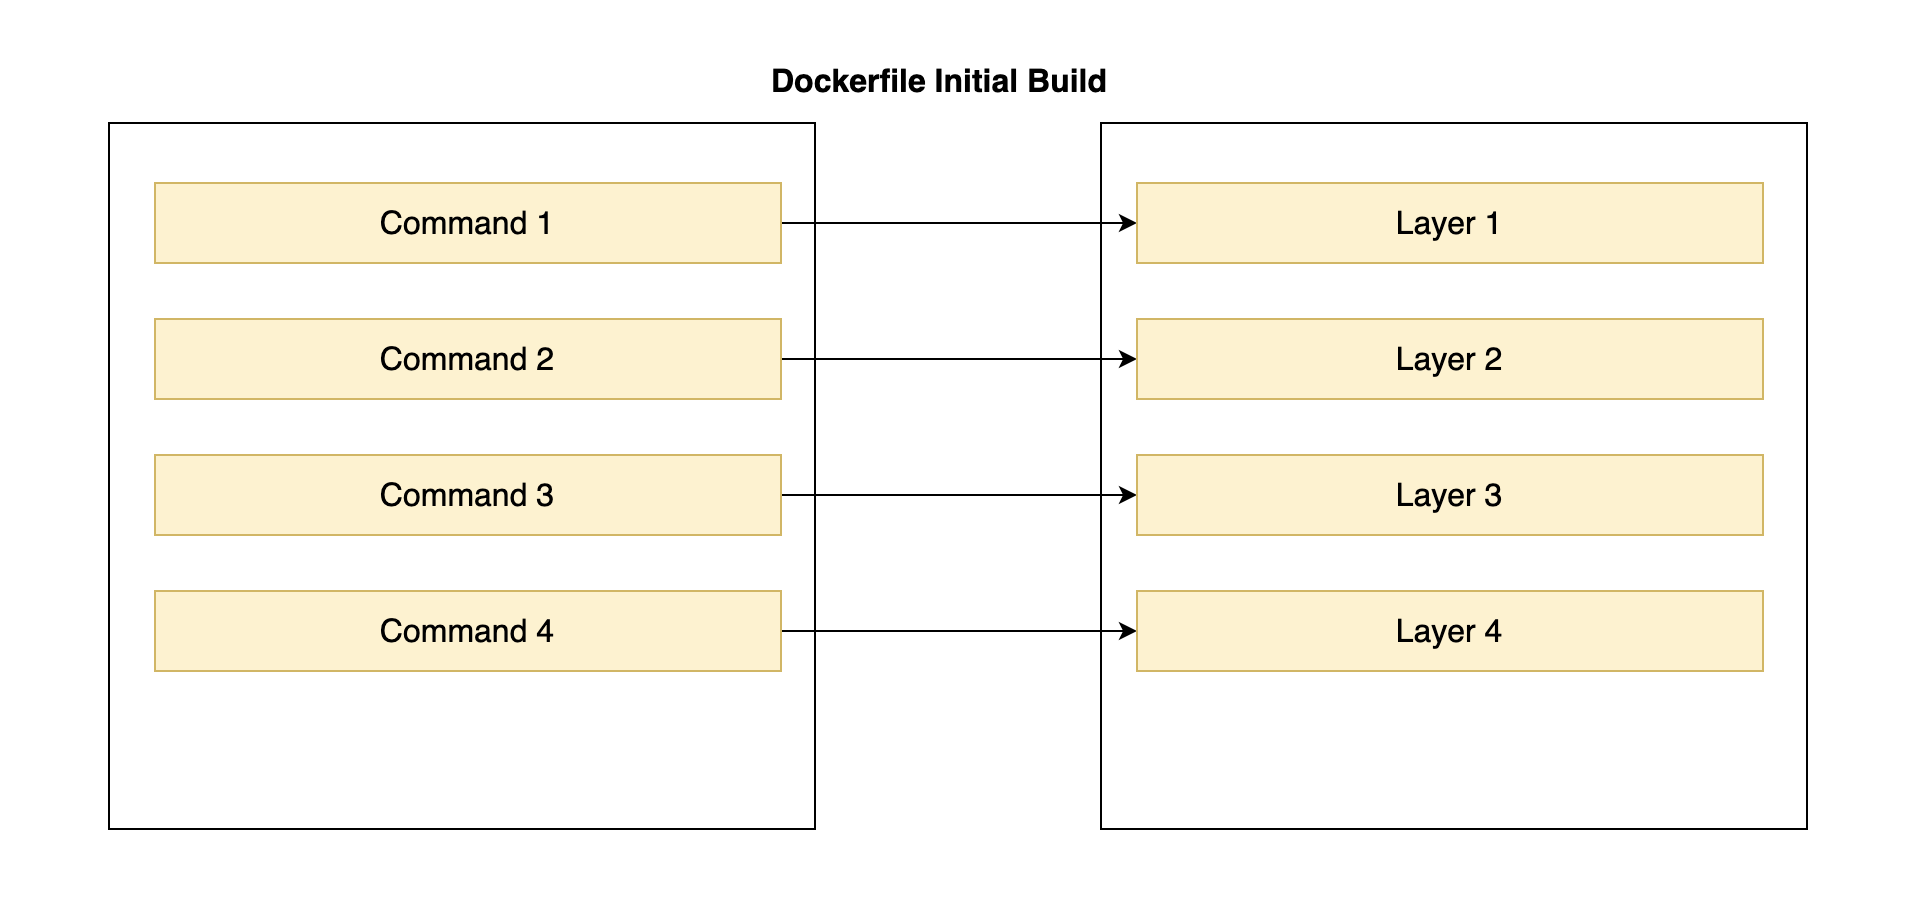
When setting your Dockerfile, you should be minded and strategic to the layers caching process. The order of the layers does matter! The following images demonstrate when the docker engine will use cached layers and when to rebuild them. The first image illustrates the initial build:

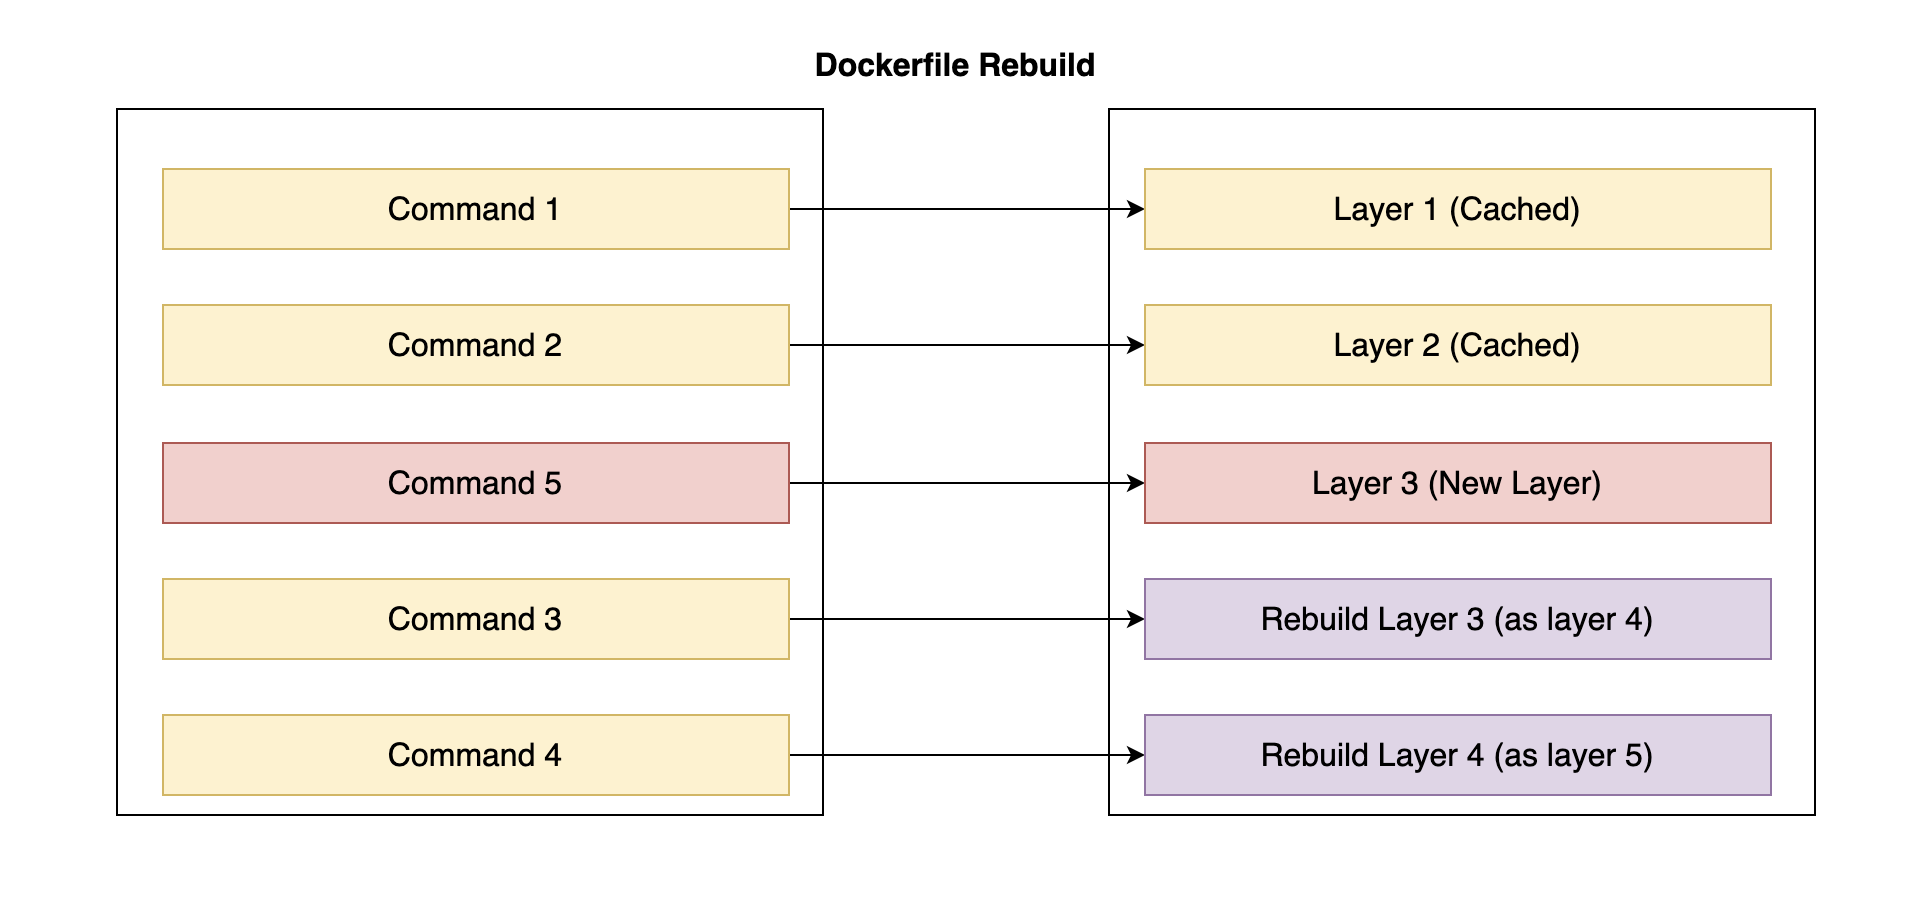
In this case, we have a Dockerfile with four commands that are translated during the build time into four layers. What will happen if we add a fifth command and place it right after the third one? The docker engine will identify that the first and second commands in the Dockerfile did not change and, therefore, will use the corresponding cached layers (one and two), and rebuild the rest of the layers from scratch:

When planning your Dockerfile, if applicable, a good practice is to place the commands that will most likely stay the same and keep new updates to the end of the file if possible.
That was just the tip of the iceberg, and there is much more to learn about Docker. The next section will explore different methods to run Python inside a container.